


Having worked in the CRM space for 25 years in various roles, I have seen how challenging data governance can be. I have also seen how misunderstood the responsibility of ‘data protection’ is.
I am certified in multiple ecosystems and was the 202nd person to gain the Salesforce Certified Technical Architect credential. It is my privilege to lead the Services team at Own and help our customers be secure in their data governance.
This is the first part of a series of articles where I’ll be talking about the Shared Responsibility Model and its implications on how you should be administering your Salesforce org. The Shared Responsibility Model is explained in many places and in many different ways - including by Salesforce themselves. You have likely heard that Salesforce is responsible for security of the cloud, while users are responsible for security in the cloud. But where does this leave you, the Salesforce platform owner/administrator?
At Own, we created the DR3 (™) methodology to help our customers be more prepared to handle data loss and data corruption. But it also includes several steps that the cloud customer - that’s you! - is responsible for, so it gives us a good framework for this series.

Part 1: Identify
We start our data governance journey with ‘Identify.’ The most obvious action item is to understand what data you have and how you treat it. If you have not classified your data, then you are treating it all equally. And data is not equal. Not at all.
We will also look at common ‘gaps’ in the security setup that can be easily missed or are there by default in a new Salesforce org.
For demonstration purposes, I have created a brand new Trailhead Hands-On Org to highlight responsibilities and gaps that appear ‘out of the box.’
Data Classification
Let’s first examine the default classification and sensitivity levels that are provided in Salesforce. We can do this by downloading the Classification file from Settings.

Only fields with sensitivity levels set will be included in the export. Here is the exported file:
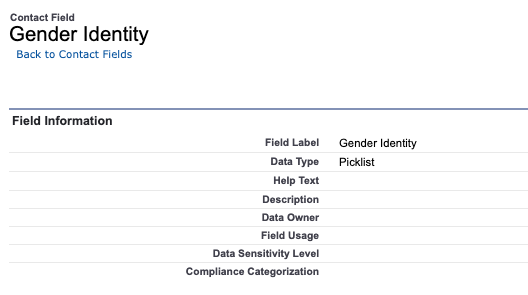
It’s empty. Nothing is classified by defaults. Even fields that could be considered sensitive or high-risk, like ‘Gender Identity’ have nothing.
There are 16,202 fields in a brand new Trailhead Hands-On Org and not one has any classification or sensitivity details. In our experience at Own, roughly 20% of fields fall under High Risk (with the remaining being 40% medium and 40% Low). That means that even in this brand new Hands-On Org, there are over 3,200 fields that are high risk, not easily identifiable, and therefore unlikely to have appropriate controls in place.
Without classification, we cannot control several elements of risk, including:
- Who can view
- Who can edit
- Who can report on, and possibly export
- What implications are there on backup and archiving strategies
- If these fields fall under some kind of regulatory control (such as GDPR or HIPAA)
- Identify the correct retention period
Without this, your ability to apply the principle of least privilege is significantly hampered. You don’t know how to treat these fields or even how to identify them. Everything starts with data classification, which is why it should be your first step in your data governance journey too.
Step #1: Classify your data
You can classify your data natively in Salesforce, though this process can be slow. There are also 3rd-party tools, such as Own Secure, which can accelerate this for you.
The Secure Services team can also classify your entire org as part of a Secure TAM engagement. In most cases, they can complete classification very quickly. Reach out to us if that is something of interest to you.
Security Setup
The incredibly granular and powerful way that permissions are structured in Salesforce makes it easy for users to become “over provisioned”. There is always a balance to be struck between usability of data and security / protection of that same data. You will need to work with stakeholders and security specialists in your company to determine an acceptable level of risk.
Some permissions allow for data to be easily exported, or, in some way, taken out of your Salesforce instance. Below are some ‘quick wins’ that can be carried out to increase your security posture.
Step #2: Check how many users have the System Admin profile
You can view this easily in Users and sorting by the Profile Name. Consider who actually needs this, and look to reduce the number. System Admin access and the associated human error this introduces scope for is the single biggest risk to the security of your data.
Step #3: Check Modify All permissions
Check which profiles have this permission. Include Integration profiles as well. Most integrations do not need the ability to modify all data. Like users, integrations also do not need this permission. You can view this easily with a SOQL query in Workbench, Developer Console, or any IDE that you use. Open Developer Workbench from your Settings icon in Salesforce, then select the Query Editor window at the bottom.
SELECT ID, Name FROM Profile WHERE PermissionsModifyAllData = TRUE.
Step #4: Check Export Reports permission
Reports are a great way for users to be able to view data in a way that helps them in their day-to-day workflow.Exporting reports, however, is a great way to ensure that data leaks from your org! You can check which profiles have this permission with the following SOQL query.
SELECT ID, Name FROM Profile WHERE PermissionsExportReport = TRUE.
Step #5: Consider checking the Schedule Report Permission
Scheduled reports are emailed to the recipient. Although this is harmless in most cases, you have introduced another egress point for your data by allowing possibly sensitive data to be delivered directly to an inbox - where you then lose control of any data controls and visibility of what happens.
SELECT ID, Name FROM Profile WHERE PermissionsScheduleReports = TRUE.
Step # 6: Check IP Restrictions and Login Hours for key profiles
This is something that depends on your company’s way of working. Where employees are remote, IP Restrictions are impossible to enforce without the use of a VPN. However if you are office-based, then it’s reasonable that some profiles should only need to login from certain IP ranges and this can be enforced. Similarly, Login hours for Support Agents (for example) can be controlled so that no-one is logging in at unusual times. Care should be taken with both these settings and as it can hinder your business-as-usual. You should record the users, profiles and permission sets that have the above permissions and settings.
There you have it-six steps that you can take to start your data governance journey. Stayed tuned for part two, where we’ll focus on step two in our DR3 (™) cycle, Protect, and provide actionable steps to mitigate the risks we identified today.


